Note on This Wiki:
The game is constantly being updated not to mention that there are plenty of secrets and strategies not covered in this Wiki. If you have new or more up to date information please add it to this wiki. It is entirely missing information on Mind Alien forms and Generic Human tips. The wiki also lacks a lot of specific stat numbers that may be important to some people.
Join the Discord server to register your account and/or be a member of the community.
GreatWeiss: I am so sorry for griefing this wiki, I have come to say that I am very sorry for all that I have done and I am retarded and stupid. Please kill me, I molested my mom.
Overview
Welcome to the Arcade Map wiki page for Parasite - Zeta, developed by Dimento and Host The game was originally created by Smith. This map is one of the most popular Arcade maps in Starcraft 2 and always makes the front page of maps by popularity. Enjoy a social deduction and deception game hide and seek game with a huge depth of content to master.
Map
As a crew member of an Explorer class space station, most of your time will be spent on the space station. Here you can upgrade various subsystems and bring the station back online to full operational capacity.
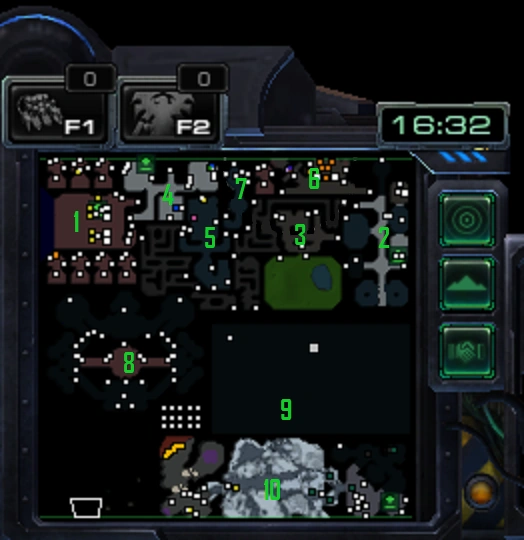
The station can be divided into 9 floors and 2 vent subsystems. Floors 1-7 have access to adjacent floors, with 6 having access to the C.O.R.E. and the reactor levels. The reactor has access to floors 1 and 7 and access to both vent systems. Each other floor has access to a particular vent system depending on whether they are even or odd. The only floor that don't follow this rule is the C.O.R.E, as it doesn't have a vent system. All the floors on the ship are:

The Cargo Bay (FLOOR 1)
Provides access to outer space for all crew members in the form of 8 ships in the hangar on the left side; ships can launch at 5 minutes. These ships can be destroyed which can deny escape for humans and aliens alike. In addition, there is a solarite processor on the right side that can process solarite brought to it by an SCV. This floor has the most amount of items that can be found at the start of the game. Floor 1 contains all shops, many mechs, an autodoc, and access to the reactor power core.
This floor also has the Recycler that can be used for item crafting. Here are bits and pieces, its no fun if we just give it away:
- M4AE Pulse Rifle = Minigun + Gauss Rifle + Frag Grenade
- Ol' Smokey = White key + Shotgun + Invinerator
- Gold Fusion Power Cell = Power Cell + Solarite
- Wunderwaffe = Arc Welder + Fusion Rail Gun + Solarite + Tesla Armour + Warp Pad
- ??? = Wunderwaffe + Medkit + Medkit + Morphine + Energy Kit + (Entity related to ???)
The recipes are going to be kept here. As long as key parts are left unsaid there should be no issue with them. Making this information available to all players helps give all players a fair shot at the game against regulars. ~Balance Officer Vel.
Note: weapons are now crafted on floor 5, on the top-left side.
The Living Quarters (FLOOR 2)
The crew starts the game in the bottom room. Floor 2 holds the Marshall room on the right side where any Security Guard, CIO, or Captain can do the following:
- Check the karma of any player;
- Check which players have fully died and are no longer in the game, even as alien;
- Check the last known location of players. (Last known location is based upon the last scan for crew)
- View station cameras after Security is level 3.
- Access the High-Sec Armory when Security is at level 5. (The Android player may also open it)
Floor 2 also contains shops. The top room contains a teleporter that can be unlocked with 4000 credits. It is heavily fortified with security turrets. The teleporter allows instant transport to the moon garage. On the left side are elevators to the Reactor and CORE.
The Biosphere (FLOOR 3)
The doctor role starts upgrades here. Holds the zoo, which contains animals that when infested spawn into strong minions. In the alien holding pens, there is an autodoc. It also holds researchable aliens in pens that, once researched, will require the alien to need more points to evolve. It is a good idea for human players to kill all the zoo animals early and research pens to deny evolution points or release of penned aliens which can infest the vents. The life support module is in the lower left corner of the zoo. All shops besides explosives are available on floor 3. There's also a conduit hatch between the pens and zoo, which can make it easy for aliens to infest this floor.
Different animals give different minions, with the highest priority male ursadaks which spawn an ultradon just above female ursadaks which spawn a breeder.
- Sheep spawn 2 broodlings
- Lyotes spawn a zergling
- Male Karaks spawn a zergling
- Crab-beetles spawn a raptor
- Tastelopes and Artosilopes spawn a hydralisk
- Ursadak calves spawn a roach
- Manta Rays spawn a glider (flying)
- Female ursadaks spawn a breeder
- Male ursadaks spawn a very powerful ultradon.
- Black Bear spawns 2x cobralisk (ranged minions)
The Medbay (FLOOR 4)
The doctor role finishes upgrades here. On the left is the vent and the autodoc system which, once researched, allows portable autodocs to be bought from med shops. As well as healthcare research, which allows for medkits, increase time on stimpacks, and multiple other things. On the right is the blood tester, which once researched can test who is alien/android/human. A conduit hatch connects these two sides. The bottom room the Gene upgrade station allowing 2 (or 3 if your the CMO/CEO) purchasable buffs listed below. The alien host can buy Gene evolution points. Alien spawns and android cannot purchase genes.
Gene Mods
- Augmented Walker
- Provides +0.4 move speed.
- Kinetic Bone Enhancement
- Provides +10% damage resistance.
- Gives an immunity to most stuns.
- Rapid Regeneration
- Gains 1.25 hp per second as passive regen.
- Regain health very quickly if out of combat for 10 seconds.
- Occular Sights
- Raises the user's base sight range to 15
- Increases Recon Rifle range by 2.
- Psionic Potency
- Rapid regain of energy out of combat.
- If bought by the Psi, it will instantly add one Psi point and increase the chance of gaining further points by 8%.
- Night Dweller
- Sight isn't hindered by cosmic storms, power outages, etc.
- Automatically cloak if out of combat for 10 seconds. Attacking will not decloak you.
- Viral Immunity
- Provides immunity to headcrabbing, silent infest (Viral Parasites), and Mental Infestation.
- Note - For viral immunity to be usable requires holding pens to be researched.
- Dermal Shield (CEO now starts with this)
- Gives immunity to all small forms of radiation.
- Gives resistance to all major forms of radiation or fallout.
- Gives resistance to knockbacks and explosions.
- Accelerated Metabolism
- Grants Immunity to all drug addictions
- Allows all drugs to last 40% longer then normal.
The Weapons Lab (FLOOR 5)
The chief weapons role does upgrades here. At the top is the station weapon upgrades, the upgrade hub for the SGT role. This unlocks stronger weapons at all gun rack shops.
- Stations weapons Level 2 allows for the stat to forcibly take ships in.
- Station weapons level 3 allows for the bombardment of moon. Infest: Placing a turret silently infests the player.
- Station weapons Level 4 allows the stat to EMP. Infest: EMP doesn't affect aliens, (Infested Bombard?)
- Station weapons level 5 unlocks nuking the moon, which used once will destroy the moon base and twice will destroy everything on the moon; the third nuke destroys the moon. The moon can only be nuked while piloting the station. Nukes may also be used on the Planet, the same rules apply and there are still only 3 nukes. Infest: If the nuke is infested upon launch a second nuke will explode upon the station instantly sending it into its 2 minute destruction sequence.
- At the bottom is the unlock-able weapons upgrade station aka bench which provides personal upgrades to one's damage and individual upgrades for different guns. The bottom room also has access to the Space Walk which can randomly infest at minutes 1 and 6. The "SW" contains the ship radar dish. Connecting the top and bottom rooms is a conduit hatch. Floor 5 contains all shops.
The Network Mainframe (FLOOR 6)
Captain, CIO, CMech and Security Guards access upgrades here. In the small room on the left side is the network mainframe allowing players to view all cameras throughout the station. The same terminal also contains upgrades for the ship's firmware and security system. At the top is the mech upgrade station. Mechs are powerful battlesuits that are immune to poison gas. Alpha codes activate Olympus and Hades mechs, Beta codes activate Apollo and Orion. Delta codes activate the ATLAS and Hercules Tanks, the most powerful in the game. Omega codes give all mechs full energy as long as Cmech or lt researched it. CMech can now upgrade mechs futher with a purchasable mech upgrading chamber, located to the top right. Last but not least Floor 6 holds the Armory which when activated gives everyone +1 armor and contains purchasable buffs to personal health, shields, and energy. On the right side are elevators to the CORE and Reactor.
The Bridge (FLOOR 7)
Controls for piloting the station
Scan for crew/aliens. (requires: level 2/4 firmware).
Lockdown the station, locking all max doors and temporarily locking down all other normal doors
Targetting crew members via the security system (requires: Captain's Card).
Gassing the vents to kill its occupants and removing infestation (requires: Captain's Card and level 3 firmware).
Activating Escape pods (requires: Captain's card and lvl 4 firmware).
On the top is an elevator to the Reactor's Oxygen Generator room.
The Reactor (FLOOR 0 or 8)
The engineer role upgrades here. On the top are two power links that can be turned off to deny power to the station's security (before Security level 4). Also top is a wheel to pilot the station and a terminal for Reactor upgrades which can repair all station components and purge all alien minions and tumors. In the middle power can be turned off by destroying the power core which takes many repair kits or a SCV to repair to full. The Oxygen generator is located on the bottom next to the bridge elevator, which can be turned off to deny oxygen to humans and psion. It is recommended for a human engineer to fortify the reactor and repair any damage to systems there when safe to do so. The reactor contains all shops and access to floors 1, 2, 6, 7.
Once the Reactor level has hit level 3 or Firmware has hit Level 5; the station can activate the self destruct sequence. To do so, one must go to the reactor switches (to the right and left of the power links and in the area of the shops.) and set the reactor switches to the up position on all 4 of the switches. An alarm will then start to ring to give a warning to the cap and anyone in the reactor floor. Then when one of the power links is activated (does not matter if its on or off as long as there is no cosmic storm going on or the transformer is broken) the station self destruct sequence will activate with a 4 minute timer. When this sequence hits 2 minutes the self destruct can NOT be averted. To turn off the self destruct, as long as the sequence is about the 2-minute mark, return the 4 switches to the down position and activate one of the power links. Alternatively if they station for some reason or another hits 20% health (2000 for station and moon or 4000 if its stat only) the station will automatically activate the 2 minute timer that cannot be stopped.
The C.O.R.E (FLOOR 9)
The engineer and android roles upgrade here. Engineer may activate many different kinds of security droids. The most popular is the TX47 Security Droid, also dubbed the "Roomba." This droid has access to all levels, paths through locked doors, and will patrol the station like a security guard. The Roomba can be upgraded to have a stronger attack, cloak, and better shields. If an alien engineer upgrades enough parts of the droid, it will go rogue, and attack anything, be it alien, human, or turret. There are also janitor droids which are good to get first. Pay attention to anyone in this floor besides engineer, because they are likely the android.
Vents
The vents contain winding paths to the different floors, essentially being a faster way to travel. In the vents are a radiation stabilizer (one in each) a security module (one for every floor) which deactivates all cameras and turrets in a floor when it is destroyed, and a path to the other vent. There are also 2 gas evaporators which can be blocked by drones. And there's exits to the spacewalk and reactor.
Outer Space (9)
provides passage between the station and the moon. It also holds blue minerals that can be harvested by ships to boost the income of all players. It is important for Deep Space Miners to be constantly mining as having a strong income is key to a successful human team winning. Space is fraught with danger though, including, alien ships, a black hole, and radiation clouds. There are mines that constantly fire when you come close which can damage your ship and the station. Cosmic storms can appear intermittently which prohibits all space travel, and black holes can also appear which can destroy your ship instantaneously and destroy the station. It is important for a vigilant captain to steer the station away from black holes if and when they appear.
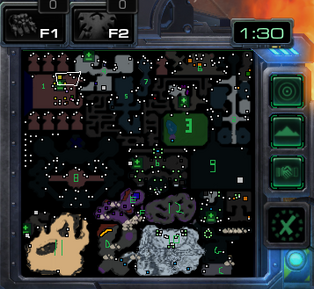
The Moon (10)
is perhaps the most interesting place on the map lore-wise. The central area is a vast expanse of ice and cold that will slow your movement down. In the center is a bunker where you can fortify yourself in the endgame. There you can find many turrets and mechs. In addition to that, you can lock the doors by finding the key card in the cave. In addition you may take the infestation logs which will affect the alien's infest ability cooldown. The Base also holds the other end of the warp harmonizer as well as powerful mech suits. On the left side of the moon, you will find a cave holding solarite and alien eggs. This is likely where the alien infestation originated. As an alien you can open the eggs to spread the infestation throughout the moon quickly. As a human it is best to destroy those eggs to deny the aliens that opportunity. When mining solarite with an SCV you can transfer it to your ship and process it back on station for an added income boost and minerals.
- On the moon, all 4 shops, the 2nd and last armory, the 2nd and last weapon upgrade station, and solarite to be mined by SCV mechs.
- Infesting the moon reduces alien NPC spawns on the station due to unit limit. Aliens should infest the moon only when necessary. Aliens at moon can also travel to Station via Overlord when no humans are detected at Moon.
- Some rooms in the back of the moon base are rigged to explode upon entry.
The moon, and bunker, can be destroyed by nuclear weapons. The nukes cost 750 energy to launch and take 60 seconds to land. It takes 300 seconds to recharge. On the first nuke landing the entire surface will be covered in radiation and the bunker will be permanently destroyed. The Second nuke will destroy the cavern permanently blocking access to the hive and solarite. The third nuke will destroy the planet. Alternatively, if the alien got level 5 weapons as CIO or CWO, when the first nuke launches it will detonates a second nuke on board the station, immediately the station will enter the 2 minute self destruct sequence as stated before.
The Bunker (10b)
The bunker is where the last people that inhabited the moon lived. The bunker itself has 3 exists/entrances, West, East, and South. The west end and The east end both end up in a a main T-shaped hallway and that hallways has 2 turrets protecting it. In the main hub is an Auto dock towards the Gene modifier (see level 4). On the east there is a weapon bench to upgrade the weapons. Onward towards the south, there are 2 rooms both containing more shops and two atlases all the way south there contains a little area that contains 4 mechs in it. Backtracking towards the north there is a "level 2" or the Bunker.
Level 2 holds another turret protecting the office and an auto dock towards the south dealing with the turret there is a max security door that is on lock down. Destroying said doors grants access to the armory and the data files. Getting said data files adds an increased amount of time it takes for the infest ability to come off cool down if it was done by a human, if by the alien it decreases it.
The Planet (11)
With the addition of The Planet the alien host now has 2 places to infest along with stat. The planet is a nearly barren wasteland and is not as heavily inhabited as the moon was. The bottom contains a runway for ships to land on. To the northwest is a mini-bunker the contains an upgrade station, a GMD, an armory, all 4 shops, and an armory. To the northwest is the catacombs which are filled with lurkers and impailers. Currently a weapon or multiple weapons may spawn down there. The planet is also inhabited by bigger and stronger yetis then on the moon. There's also solarite in the catacombs which you can mine.
Catacombs in addition also has a mini-boss which can drop white key and gives you 1000 minerals on death. The white key is used to craft a legendary shotgun called Ol'smokey. Ol'smokey's craft recipe is the following. Shotgun + Incinerator + White key. To craft it you simply put these 3 items into the recycler located at the floor 1, Ol'Smokey has an AOE of shotgun, upon hitting anything with It's attack it lits the target on fire dealing damage over time. Not only that, it has generally colossal dps and is one of the best weapons in the game. It is also affected by incinerator's and shotgun's special upgrades.
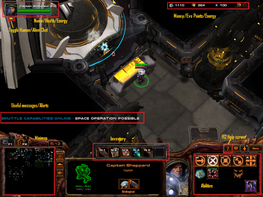
HUD

The heads up display (HUD) is shown on the right.
- Displays your health/energy. If your health goes to 0 you die and cannot respawn, although you can observe after you are dead. However, if you are human and your health drops to zero due to an alien hitting you, (or you are infested), you will become an alien spawn and switch sides. Energy is consumed when using abilities such as flashlights, grenades, and sprint. Conserve your energy so you can use it when required.
- The Flashlight can always be toggled on/off by pressing F
- Motion Sensor can always be toggled on/off by pressing G
- Toggle Human/Alien Chat - Appears when you are alien. Click this button to switch between chats to all players or aliens only.
- Money/Evo Points/Oxygen - Displays how much money, evo points and oxygen you have. Money is used to purchase items and upgrades on the station and increases over time. Its rate can be increased by mining or doing your duties on the station (see roles further below). Evo points appears when you are alien and increases over time to perform evolution or spawning minions. Oxygen begins to drop when the oxygen processor is turned off on the station. When it drops to zero you will die. Picking up and using Oxygen tanks found on station will keep you alive.
- Useful text messages will appear here, pay attention to these alerts.
- The minimap shows where you are on station (see map above). As alien you will also receive a location ping on all alien spawn and human players.
- Your inventory shows what items you have. You only have a limited amount of items that you can carry with you. Click on them or press the corresponding numpad to use.
- Your abilities are you special powers that you can use. Hovering over the money shows you your current income. Pressing T as alien allows you to transform between alien and human form (T1-T3 alien).
- Pressing Insert/Delete will rotate the camera perspective to see behind things. Useful for seeing loot crates against walls and people hiding in the vents.
- Type "handles" in chat to see a list of crew and their BNet Name. Useful for finding your buddy or reporting a toxic/trolling player.
Roles
There are 8 crew member roles that are assigned at random to each player at the start of the game. Each role gives a player a different set of abilities and responsibilities aboard the space station. It is important that you stick to your assigned role as you and your crew mates will receive strong bonuses. These different roles are listed as:
- Captain (Cap/Cappo)
- Chief Intelligence Officer (CIO) (also referred to as "LT")
- Chief Mechanical Officer (CMO) (usually referred to as "maj" or "cmech")
- Chief Weapons Officer (CWO) (usually referred to as "Sgt")
- Chief Medical Officer (CMO) (usually referred to as "doc")
- Chief Engineering Officer (CEO) (usually referred to as "engi" as a reference to FTL)
- Security Officer (Usually refered to as SG, but can be referred to as Offi)
- Security Guards (SGs)
- Deep Space Miners (DSMs) or sometimes just "Slaves" (Miners do REVOLUTION if you say this!) instead of space. (Even though it is considered rude)
/\ Are also known as Dedicated Sandwich Makers (DSMs) These roles can also be one of 4 special roles, only unlocked with higher karma.
- Human: No special ability, can be turned into a Alien Spawn, or give Psion a Psi point if killed.
- Alien Host: Can Infest any organic, and any kills on humans while in Alien form or while they are infested (headcrabbed) will turn them into an Alien Spawn (requires 70+ karma to be opted into)
- Psion: Can be good, which will work with humans, or Evil, which means you're on your own. Can use different abilities depending on the alignment. Killing a Spawn, Host, or Human will give you a Psi point, and change your alignment to Evil if the killed person is a Human. Can't be spawned, but can be infested (headcrabbed). Aliens will not be able to see that you're psion until you reached good augmentation or evil augmentation. If you're evil, they will see you as a red ping, and if you're good, they will see you as a teal ping. You can be discovered by psi scanner, located on the 4th floor near blood test. Killing android does not grant you any psi points. (requires 80+ karma to be opted into)
- Android: Can upgrade self in C.O.R.E with little things, or change completely into a new form. C.O.R.E gives the Android a directive to either protect humans, Eliminate all threats, or Protect the Aliens. (requires 80+ karma to be opted into)
Press F12 in-game to read up on the specific role you spawn as. In a full lobby there will be three SGs and three DSMs. All other roles are randomly assigned to one player. A more thorough explanation is provided on each role below.
Captain (Cap)
The Captain is the commander of the station and its crew. They possess the Captain's keycard which allows them to activate key station's functions, command security targetting systems and lock doors. As such they have authority over the station unless they pass the keycard to another. Their role is to coordinate and direct the crew on exterminating the alien threat.
The Captain will typically stay on the Bridge alone where they have full view of the station's cameras. From here they have full control and pilot capabilities for the station. However some of the functions are disabled until a specific firmware level has been researched. Watch for any suspicious happenings and communicate to the crew. Captain can pick targets for auto-defense turrets to shoot with their keycard. Captain can move the station, heal it, and attack anything nearby in space. In addition they can activate various station functions depending on firmware level. The firmware 1 unlocks scanning for crew. Security upgrades allows station lock-down closing all doors. Firmware 2 permits scanning for aliens. Firmware 3 allows decontaminating the ventilation shafts. Firmware 4 allows activating drop-pods for quick transit to the moon. Firmware 5 allows station self-destruct in coordination with engineer, use with extreme caution.
The Captain can lock/unlock any doors with his keycard, however only black high-sec doors will remain locked. It is a good idea to barricade and lock the bridge to prevent the captain from being infested by aliens. An Alien Captain can turn the station's security on human crew members which will cripple the human crew. Make sure that the alien doesn't come through the vent on lvl 7 as a sneak attack on an unsuspecting Captain. Scan often and decontaminate the vents to kill anything growing inside. The Captain gets a credit bonus for remaining on the Bridge.
Alien Effects:
- Upgrading Firmware 2 will provide Aliens more bonus periodic income, crew scan has a minor chance to not show any crew members on scan.
- Upgrading Firmware 3 will cause Vent Gas to heal Aliens instead (Still damage Alien Minions)
- Upgrading Firmware 4 will silent infest anyone who uses Drop Pod and also has a minor chance to make a random place pinged via alien scan.
- Upgrading Firmware 5 will make Self Destruct to instantly be set to 2 minutes, making it unable to be cancelled.
- Can easily sabotage as Captain has access to all locked areas
- Able to trap and infest someone in a room by locking the doors via Captain Card
- Has the ability to target someone with turret easily when they are accused by others
Chief Intelligence Officer (CIO or Lieutenant)
The CIO is the second in command on the ship and the Captain's chief lieutenant. While their foremost priority is to assist the captain in its duties by upgrading the firmware and watching the cameras on lvl 6, the CIO can assume any role on the ship.
CIO mainly watches cameras on level 6 at the security mainframe along with the Captain. They will coordinate strategies along with the captain. CIO also has access to all security doors that have an accessible panel. The CIO gives bonuses to upgrading any of the station's research, the same as it being upgraded by the specialised officer. Thus CIO may also assume any of the different roles, especially if that role is MIA/KIA. CIO should start by purchasing cheap upgrades such as weapon upgrade station and armory, as it gets personnal bonus income from any upgrade purchased.
Alien Effects:
- Has the ability to infest every upgrades
- Can gain a massive alien upgrade for a cheaper cost, by letting others to research until certain level and sneakily upgrade the higher level
Chief Mechanical Officer (CMech, CMechO, Mech, or Major)
The third in command on the ship, the CMech's job is to bring the armoury and mechs online. The CMech gets a bonus to piloting mechs with increased damage and less mech fuel use. These mechs can save a dire situation when used correctly. The most powerful mech, the Atlas, can hold off several aliens at once. In addition, the armoury can also be used to purchased upgrades that can make players very hard to kill. CMech should always keep a motion sensor with him, as he can use it while piloting a mech.
CMech upgrades the mech codes and armory on level 6. The first Alpha Codes activate SCV's which is needed for dsm's to mine solarite as well as to repair any damaged turrets or station systems by the aliens. After fully upgrading the mech codes, cmech will typically pilot an Atlas and destroy any powerful aliens with extreme prejudice. CMech can take an Atlas to the moon via the level 2 warp chamber, although there's a second Atlas on the moon as well.
A quick rundown on the different mechs are:
Alpha Codes
- OLYMPUS - A battlesuit that does good damage and penetrates armor.
- HADES - The only mech capable of entering vents, ships and drop pods.
Beta Codes
- APOLLO - A speedy vehicle that fires rockets which penetrate armor and deal bonus dmg to armored.
- ORION - A tall mech with a railgun designed vs mechanical units.
Delta Codes
- ATLAS - A powerful battlesuit that rains death and destruction on all. Only 4 available in the game on lvl 1, 6 and 2 sit on moon base.
- HERCULES - A beefy tank with a powerful armor-ignoring cannon and a top-mounted machine gun. Only 5 are available in the game. 1 on lvl 1, 3 in the hanger on the moon, and 1 on planet.
The last upgrade that can be researched (Omega codes) gives a fuel boost to all mechs, it will give full fuel if researched by Cmech.
Alien Effects:
- Upgrading Alpha will give evo points whenever anyone power ups a mech
- Upgrading Beta will silently infest anyone using a mech.
- Upgrading Delta will turn OLYMPUS into the alien side when activated.
- Upgrading Omega will turn ATLAS into alien side when activated. Because it also fully powers the mechs, it allows you to activate them all very quickly.
Chief Medical Officer (Doc, CMed, CMedO, or medical)
The CMed is in charge of all the medical research. It is one of the most crucial early game roles, being in charge of bringing important systems online before the alien infests them. An Alien CMed/CIO can buy those upgrades and cripple a human team. Once all the systems are researched the CMed is less important and can focus on purchasing weapons and armour or testing suspected players with portable blood testers.
CMed has four responsibilities. Open the high-sec door to level 3's zoo to exterminate the animals; thereby preventing an alien infestation, research the aliens in the pens on level 3, and research the autodoc and bloodtester on level 4. All give very beneficial effects.
Pens cannot be released until 3 mins and 30 seconds. Use this time to clear zoo as much as you can, then come back to pens and secure them. After pens were researched, if the alien hasn't shown any sign of aggression, you'd want to upgrade the blood tester, and test high importance roles. They are the least likely to be aggressive, but they can be extremely dangerous if they infest key upgrades so it's good to expose them as early as possible.
Alien Effects:
- Can easily release pens, infest the zoo, and destroy the blood tester because its job is to be there, this however will cast suspicion on the doctor as well since it is their job to make sure these things don't happen.
- Performing research on the pens reduces evo point needed for evolutions.
- Upgrading auto docs will silently infest anyone using a portable autodoc, it also makes portable auto doc not be able to cure radiation dosage.
- Upgrading the Blood Tester will reduce it's accuracy to 10%.
- Can easily Rig Blood Tester to do one or more of the following:
- (Explode) Explode when someone tests,
- (False Positive) ALWAYS show the person who tests as alien,
- (Protect Aliens) NEVER show aliens who test as alien,
- (Silent Infest) Silently infest the person testing with a viral larva,
- Notes:
- Being infested with viral larva means being silent infested,
- To rig the Blood Tester, you have to be an evil role,
- Only alien can rig Blood Tester to protect aliens,
- ONLY Alien Chief Medical Officer or Alien Chief Intellegance Officer can rig Blood Tester to Silently infest the tester,
- I'm pretty sure (90%) that if Blood Tester is rigged with both: False Positive and Protect Aliens then False Positive takes priority.
Chief Weapons Officer (CWO, Sgt or Sergeant)
CWO is responsible for upgrading station weapons and the weapon upgrade terminal, and gives a bonus for each, along with CIO. Each station weapons upgrade unlocks more purchasable options from weapon racks, and later upgrades improve station capability. CWO also brings the weapon upgrade station online, where weapon damage can be increased. It is very important to upgrade Station weapons as it unlocks powerful rifles that are required to fight higher tier aliens.
Alien Effects:
- Upgrading Weapons 2 will reward host evo points whenever someone buys a weapon
- Upgrading Weapons 3 will silently infest anyone who bought or picked up a gun; or anyone who placed a turret.
- Upgrading Weapons 4 will enable any player at station controls on 7 to bomb the planet/moon.
- If Bombarding Player is Alien, the planet-bombing shells will do 3x damage to humans.
- If Bombarding Player is Human, the shells will backfire into the station, causing random explosions on station.
- Upgrading Weapons 5: will cause a 30% Damage Debuff to all Weapons against aliens. All turrets (sentry guns, exterminator turrets, tesla turrets) will ignore aliens and rather target humans instead and If the nuke is launched the station will automatically go into self destruct.
Engineer (Engi or CEO)
The CEO is responsible for upgrading and defending the station's core reactor and power generator on the reactor level 0. CEO has half the cooldown time with repair kits, starts with a quick-building SUV, starts with the gene of Dermal shields, have +25% DMG on plasma cutter and can repair the entire station with the quantum reconstruction ability from the reactor. The Engi should place turrets around the whole reactor level to defend as well as coordinate with other crew members to time the activation of abilities on the station.
Alien Effects:
- Upgrading Reactor 2 will cause alien eggs to give 1.5x the evo points when placed in the reactor.
- Upgrading Reactor 3 will cause a 33% chance to silent infest anyone who enters the reactor.
- Upgrading Reactor 4 will make the quantum ability, when used by an alien, to explode all turrets at stat instead of healing them
- Upgrading Reactor 5 will permanently destroy the power core transformer, causing a blackout for the rest of the game. This will also prevent targeting, de-targeting, reactor abilities, and turret power if the turrets need station power to function.
- Unlocking 2 out of 5 of the security droid's upgrades will make the AI go rouge. The droid then targets every human and turret
- Unlocking 5 out of 5 of the security droid's upgrades will make the AI self-aware, constantly upgrading itself to become more powerful over time as well as allying with the aliens.
Warning there is a typo with the In Game Help for CEO that tells you to go to level 6 for your upgrades. This needs to be fixed for newbies. (still exists as of 2/23/19)
Security Guard & Security Officer (SG/ Officer)
The Security Guard's is one of the most active roles. Its job is very simple; to keep the crew safe and hunt down/respond to alien threats. This role should be guarding important crew members, upgrading security, and wandering between floors and vents actively seeking out the Alien. In addition, the Security Guards are stronger than other crew members and can beat them in a 1-on-1 fight.
Bonuses:
- The Stimpack ability has increased effectiveness on Security Guards and each Security Guard starts the game with one.
- Security guards gain double the reward for killing Alien Minions, as well as clearing infested Life Support Modules. They have extra base health and armor, and gain bonuses to their health as the Station Security is upgraded.
- They also gain bonus periodic income when they kill either the Alien Host or Alien Spawns.
- Along with the Chief Intelligence Officer, when upgrading Station Security, an extra bonus is provided.
- Security Officer Only: Starts with a Shotgun and a Medkit instead of a gauss/stim
Alien Effects:
If the Security Guard is an Alien, every Alien Minion it kills in Human Form will give Evolution points to the Alien Host. Upgrading security also make turrets to have reduced damage against aliens
- If 3rd, 4th and 5th security upgrades have been upgraded by the alien and all security modules are up, then the station turrets become infested. The captain loses control of them, they auto-target all humans, and won't target aliens. Cameras also provide vision for alien host and the spawns from that moment on.
Deep Space Miner (DSM)
The Miner's job is to mine minerals for the crew to increase everyone's periodic income.
Mining is performed by getting a ship from Floor 1 - Cargo, undocking, and mining the minerals that float around the sector. Undocking clearance is granted at the 5 minute mark. To mine, just right click/interact with a mineral cluster.
Small Mineral Clusters are worth 2 for DSMs and 1 for other jobs, Large Mineral Clusters are worth 4 for DSMs and 2 for normal jobs, Rich Mineral Clusters are worth 8 for DSMs and 4 for other jobs. Every 60 Clusters mined will increase the crew's income. But watch out for the mines. Each mineral cluster mined will reward the DSM with 30 minerals.
Mining Solarite is much more efficient but is only found on the moon and planet catacombs. Solarite begins in a Crystal. Mine the crystal by powering an SCV exo-suit and gathering from it. Then take it to the ship. Leave for the Station (Preferably when you have multiple Solarite Shards, 4 will generally do). When docked, carry the Solarite Shards over to the Jorium Refinery Model. (It looks like its crushing a lot of Solarite already). This provides an instant crew income increase and gives the miner 500 minerals
Bonuses:
- A miner using thermite charge will have thermite charge deal more damage.
- All miners start with a proximity mine and a thermal shield.
- Miners gain double the reward for mining mineral clusters. They also gain double the progress towards increasing the crew income level when mining clusters.
- Miners gain bonus income for successfully refining Solarite, in addition to the normal income boost.
- Miner ships have additional speed and their energy drains slower.
- Deal +20% damage with plasma cutter and start with one.
Alien Effects:
If the Deep Space Miner is an Alien, every Mineral Cluster mined will give Evolution points to the Alien Host.
Note for roles:
All crew roles require specific amount of games as listed below:
- DSM: >0
- SG: >5
- Security Officer>7
- Chief Weapons Officer>10
- Engineer/CMechO>15
- CIO>20
- Captain/doctor>30
Station Upgrades
Ships
Located in the hanger on level 1 are the star cruisers that serve as the station's mining vessels. They can be flown into space after 5:00 minutes. They can land on the moon and back on the station at will for refueling. They take damage when energy is drained or when flown during a cosmic storm. They are equipped with basic missile weapons and a disabling laser cannon. In addition, the ship can be upgraded to stealth cruisers, assault cruisers, and even battlecruisers with their upgrade panel on the left. Stealth cruisers have extra energy (+50) and an ability to cloak. Assault cruisers are an upgrade for everything, this includes damage and speed. Battlecruisers are the most powerfull cruisers out of all 3, capable of killing station fairly quick if left unattended. Battlecruisers counter stealth cruisers and assault cruisers via EMP ability which drains 300+ energy from any nearby units and stuns them (with the exception of drop pods), so if station is dead It's best to simply use drop pods or another battlecruiser to counter the battlecruiser. Having energy via ship is very important as if you have 0 energy your ship's life will slowly drain and your ships speed is reduced, not only that but you're unable to attack anything via the ship.
Warp-pad
The warp pad costs 4,000 credits, and once purchased can be toggled on/off from station or moon independently. Both station and moon warp must be on for it to function. Useful for transporting mechs from moon or station, and a nifty way for aliens to get onto the station from the moon.
Specimen Research
Usually the first Dr purchase. This disables releasing the pens and increases the cost of evolution for the alien. If purchased by the alien, it decreases the cost.
The pens can also be unlocked, releasing zerg into the station's ventilation system and throughout the station. Because of this, human doctors usually fortify the pens to prevent this from happening.
Autodoc Station
These are on floors 1,3,4 and moon. They heal and remove infestation. Useful for restoring health or de-infesting your fellow crewmembers. They also remove 100 radiation stacks.
The Doctor can upgrade these to make a portable, single-use version. Useful for clearing infestations on life support modules. Infested version of portable auto-doc instead silent infests you and does not cure radiation stacks.
Blood Tester
On floor 4, tests for alien DNA and announces results. 60% accuracy, so it's possible for an alien to show as human, but not for a human to show as an alien. Doctor purchase increases accuracy to 80%. Alien doc purchase makes it 10%. The blood tester has 2000 Health and will be permanently offline when destroyed. When destroyed, all forms of blood testing are purchaseable, and blood-testing ablilities are useable can add psi tester to show psi on test. Can be rigged by alien/evil roles.
Rigges:
- Mine BT: Makes bloodtest explode very violently.
- False positive: Shows everyone as alien.
- Protect alien specimens: Does not show aliens upon bloodtest.
- Silent fest (only for doc/lt): Silent infests anyone who uses the bloodtest.
Fun fact: Combo of Last 2 riggs can help you ezly fest all crew with silent fests (if he go test 4 sure).
Weapons Levels
Upgraded on floor 5 by the CWO/CIO. See the Weapon Rack section.
Level 1
- Gauss Rifle
- Incinerator
- Recon Rifle
- Shotgun
- Plasma Cutter
Level 2
- Arc Welder
- SubZero
- Gamma Ray Gun
- Laser Rifle
Level 3
- Neutronium Rifle
- Pulse Destabiliser
- Particle Phaser
Level 4
- Minigun
- Plasma Rifle
Level 5
- Fusion Railgun
- Antimatter Rifle (A legendary weapon as well)
- Light Saber (A legendary weapon as well)
Legendary weapons
- M4AE Pulse rifle
- Ol' Smokey
- Wonderwaffe
- Ion Riffle
Security
Besides strengthening station guns and cameras, some upgrades have additional effects.
- Level 1: Activates Sentry Turrets, and A-Sec, which will autotarget people caught attacking crew members or station equipment.
- Level 2: Unlocks Security Lockdown ability from the bridge, and increases Camera range.
- Level 3: Allows cameras to be accessed from the Marshall's office on floor 2, and add autotarget for alien transformations.
- Level 4: Enables station defenses to work without station power. Targeting, weapon overcharge, and quantum abilities are still locked.
- Level 5: Adds a great bonus to health and damage for all defenses, and unlocks the High Security room on level 2.
Note: if the following security upgrades, 3 4 5, were researched by alien SG/SO/CIO, all turrets will turn rogue, targeting any human in sight, disengaging alien players, and ignoring alien minions. Humans can no longer use targeting systems. If an alien transforms in front of a camera, they will still be revealed as an alien. If a station gun kills a human, they become an alien spawn. All aliens gain sight radius of the cameras in addition to that.
Firmware
Upgrades station operating software, increasing crew income, and enabling the use of advanced abilities.
- Level 2: Enables the use of Crew Scan.
- Level 3: Enables the use of Vent Decontamination.
- Level 4: Enables the use of Alien scan and Escape pods.
- Level 5: Enables the use of Self-Destruct.
Mechs
Upgraded at the Mech depot on floor 6 by the CMech or CIO. Mechs are mainly found on levels 6, 1, the moon bunker, and scattered in other placed.
Armory
Activated on floor 6 by the CMech or CIO. Grants defensive upgrades and powerful abilities. When infested, all alien attacks will get a 25% bonus to armor piercing.
Weapon Upgrade Terminal
Activated on floor 5 by the CWO or CIO. Allows one to upgrade their weapons for more damage and bonuses. When infested, each upgrade gives the host 90 evo points.
Gene modifier
Activated on floor 4 by the CMed or CIO. Humans can purchase up to 2 enhanced genes here. Human CMeds can get 3. Any aliens can purchase evo points for the host. If a gene-modified human is spawned, they lose any and all genes.
Alien
Tips
- Passive vs.Aggressive
- Passive - Staying "human" as long as possible, infesting your upgrades and staying away or destroying the blood tester. Gives you time to infest upgrades and become stronger. Being passive usually means waiting until you are fully evolved to attack the humans. Currently playing passively is not as beneficial as it should be, hopefully this will change going into the future allowing more high-level deceptive play.
- Aggressive - Leaving the crew as soon as possible to sabotage them early on. Also known as rushing, where you try to quickly kill humans one by one. Infesting the moon, other crew, and killing security modules will allow a brute-force attack onto the station. This is the advised path as risky as it is.
- Know the vents and conduit hatches to move quickly, infecting parts of the ship and escaping. Alien forms can move faster through vents than humans can. Let me stress this again USE CONDUIT HATCHES.
- Host T1 cannot use Conduit hatches at the time of writing this, however it is known to change back and forth.
- Destroy security modules in vents near each exit before infesting the life support. When the security module is down, all turrets and cameras on that floor are visibly disabled. An arc welder or Plasma Cutter is the weapon of choice for it, just make sure to keep it quiet; the arcs are noisy and can alert humans that security modules are being destroyed.
- Keep in Mind Hades mechs can enter vents, carrying a Pulse nade around is a good way to counter a hades mech in vents and possibly even spawn the major.
- Infesting an animal in the zoo will spawn alien minions that can quickly overtake the entire zoo. This creates a huge alien swarm that will rampage throughout the station sowing chaos if not dealt with by the human crew.
- Works especially well if the crew hasn't bought the initial turret upgrade.
- Zoo currently starts unlocked if you run north at spawn you can probably get there before doc, a good escape route if you get locked in is to buy a stealth kit at the gadget shop in the Zoo, then use it to escape to 4 as the swarm is unleashed. Be warned AOE damage will uncloak you.
- Aggressive/Passive: Only an alien can attack cameras, security modules, radiation stabilizers and the station's power core, so don't let humans see you attacking these. (Loosely true, there is a purposely unfixed bug allowing humans to do this)
- Use an Arc Welder (Plasma Cutter works too) instead of your starter gauss to kill these.
- Killing cameras will allow you to attack players openly without being targetted by A-sec. (Essentially Auto-targeting for attacking humans on camera in human form.
- Aggressive: Deep Space Miners that are about to mine and haven't yet fortified their ship with barricades, they can be an easy target by going inside their ship when they are about to take off (Usually 5 Minute Mark+)
- You can hide in the ship's vents and wait for a DSM to take off.
- You can also get on a ship at around 4:59 as they launch so they are trapped in with you. This is a risky strategy however as it is possible that they might have a turret by then.
- DSMs have their camera focused on space, so they will automatically attack rather than use abilities or even acknowledge that they are under attack. (At first, if they are good they will notice)
- Aggressive/Passive: Utilize Explosives at key points to easily kill someone off guard such as The Bridge Camera Spot, Infested Life Support, Non-portable Autodoc, and Ship piloting spot, Station Mainframe.
- An explosion by a nearby fuel tank will create another large blast.
- Keep in Mind all explosives show your true color on them, even remote mines despite being cloaked.
- AIED's while expensive are a wonderful tool to kill those who don't pay close enough attention to their characters. If captain seems vulnerable you can break into oxygen room from vents, then use an AIED and send it into floor 7 from there, I'd advise letting the First charge reach about halfway before sending it through the door to leave cap minimal time to react.
- Passive: Accuse peoples as infected by having them blood test while they have a silent infestation. (Silent infest can causes Blood Test to identify them as Alien regardless of them being a human)
- One way to do this is by infesting the autodocs, then autodoccing people before their test. (Discreetly of course.)
Vulnerable Station Subsystems
- Destroying both radiation reactors in the vents will cause radiation to affect all human occupants on station. They are at the bottom of each vent.
- Infesting life support will spawn creep tumors and alien minions on their level. Infesting all 6 life support modules on the space station will cause drop pods to be infested and start sending minions to the moon, provided there are no humans left on the station.
- Turning off oxygen will cause human players to require oxygen tanks or die instant deaths.
- Destroying security modules within vents turns off all security cameras and turrets on that floor.
- Disabling station power will make it so turrets, cameras, and power-requiring abilities will be locked down.
- Turning off both power links will alert everyone that they are off, and a fun way to cheese aliens through the station.
- Destroying the power core takes some time, and also keeps power off for longer. Usually harder to detect, as it gives no alarm.
Evolutions
Tier 1 - Starting evolution - 0 evo points
- Infested Human
- This is your starting evolution. It starts the game in human form, and has no abilities.
- Attacks deal a slight damage over time
- All aliens have slightly faster passive regeneration than humans
- All aliens are immune to lack of oxygen and Situational radiation effects (Gamma gun still gives aliens Rads, which passively go away over time)
Tier 2 - Infest life supports and lay eggs - 600/660/555 evo points
- Mind
- Lift ability, allows for the alien to lift the person
- Push ability, allows to push a person
- Has a ranged attacked
- Mind infestation is less noticeable with the only noticeable thing being people not being able to hear you and black lines on the screen appearing randomly.
- Zergling
- Frenzy ability, increases attack and movement speed.
- Burrow ability, can burrow in the ground to hide from or ambush humans
- Rapid out-of-combat regeneration
Tier 3 - Morph vent nodules - 1200/1380 evo points
- Beetle
- Gains an additional life bar that has 15 armor
- Frenzy now restores 45% of your maximum armor life over time
- Burrow now rapidly restores life and armor life
- Acid saliva ability, slows attack and movement, and does damage over time.
- Bat
- Can disguise as a human
- Flies over barricades and turrets, and becomes untargetable by them
- Some weapons cannot hit air units
- Much faster
- Burrow ability removed
- Attacks are ranged and hit air units
- Many more abilities
- Less tanky then other evolution
- Xenomorph
- Attacks are ranged and can hit air units, cameras and security modules
- Mend ability, restores 45% of your life instantly and more over time
- Debilitating saliva ability, greatly slows attack and movement speeds
- Velociraptor
- Frenzy ability, Increases speed and attack speed
- Pull ability, Pulls the target towards you and stuns them.
- Cosmic Assassin
- Has the whirlwind ability, which cleaves in a circle slowing down all people until they autodoc
- Can Cloak
- Host can call in a cosmic storm which buffs them even more
Tier 4 - Infest ability buffed - 1200/1500 evo points
- Xenodon - Evolves from Beetle
- Much more life and armor life, huge regeneration abilities
- Can no longer use the Burrow ability
- About half as fast
- Can no longer disguise as a human
- Can charge
- Can increase attack and movement speed
- Flame beetle - Evolves from Beetle
- Burrow ability ignites fires above it
- Can no longer disguise as a human
- Attacks are ranged
- Explosions and fires now heal instead of damage
- Alien minions still take fire damage
- Abilities adapted to inflame your targets, healing alien spawns and damaging humans
- Venomous bat - Evolves from Bat
- Abilities suited to deal more damage to mechanical and biological units
- Xenoraptor - Evolves from velociraptor
- Can no longer use burrow or mend abilities
- Many survival adaptations
- Invisible to motion sensor
- Immune to fire and cold (explosions still damage you)
- Gain a buff to life, armor, movement speed, and damage if you are near another alien
- Attacks are melee and can only hit ground units
- Camouflage ability, cloak and move 40% slower. Casting abilities, taking damage, or dealing damage will decloak you and set a cooldown.
- Swarm Queen - Evolves from Xenomorph
Tier 5 - The Last Stand - 1200/1500 evo points
- Alpha Xenodon - Evolves from Beetle
- Doubled life
- Attacks are melee and cant hit air units
- Flame Gargantuan - Evolves from Beetle
- Must evolve on the moon or planet
- Can't enter ships
- Can't use warp pad
- Has massive sight radius
- Many powerful flame abilities
- Takes bonus damage from SubZero
- Noxious Monstrosity - Evolves from Bat
- Much, much slower than it's previous evolutions
- Much tankier
- Alpha Xenoraptor - Evolves from Xenoraptor
- Better version of xenoraptor further buffing stats.
- Staying in groups is further buffed.
Minions
These spawn from creep tumors and infected life supports and can evolve into more dangerous Minions. Minions will grow stronger as the Alien Host evolve into Higher Tier Evolution
- Swarmling: The first type of alien minion, relatively weak and had the most numbers.
- Feederling: Spawned from creep tumors and infected life supports, slow movement speed but can become a creep tumor.
- Creeper: Spawns by creep tumors and infected life supports.
- Swarmhost (T4 host form needed): spawns 2 creepers every 8+-sec
- Raptor (T3 needed): advanced form of swarmling can jump to target sets debuff bleeded drains like 30 hp at 10 sec
- Banelings explodes when ded deal DMG to ALL around (to enother minions too)
- Ultralisk (T5 needed) OP minion 2 layer of armor 50 hp with 10 armor and 150 hp with 4 armor can CHARGE to targets and do stun for 2 sec.
- Roach have 2 layers of armor 25 hp with 10 armor 1 lay and 2nd lay 75 hp with 2 armor
- DOOMling (T5 needed) advanced baneling do more DMG to more zone
Eggs
"F" ability eggs passively generate evo points.
You gain 20 invincible permanent eggs upon station's death.
Eggs can morph into a viral parasite. Virals are not targeted by station turrets and can infest, silent infest, or create a creep tumor to generate minions.
Eggs can also morph into a drone to build a hatchery, vent nodule, or sunken colony. The hatchery is able to spawn different minions on command, depending on the host's evo level, final evo unlocks all spawns. Sunken Colony Is a large, heavily armored defensive structure which has a below ground Tentacle attack. Cannot miss.
Infestation
Every alien in the game, when killing a Human will turn it into an Alien Spawn. Alien Spawns are the weaker versions of the Alien Host. They and Feederlings can throw Parasites at Animals, Humans, and Life Supports, infesting them. Spawns can not be created at Stage 4 and 5 of aliens and someone with low karma points can't be spawned.
Strategies
One must pick to go passive or aggressive. If one goes passive the BT must be tampered with in someway be it rigging it to explode or give false positives or killing it. Passive also relies heavily on the Android or Psion to be or go evil to help thin out the crowd as the host won't be doing much. often after hitting T4 and not being able to disguised will allow the host to start killing. However the crew will be stronger and the host will have no spawns to help them. An aggressive host can kill the BT and strolls around vent making sure their use is limited. A nice reminder is that a T2 body host can always beat an upgraded Hades if that ever becomes the case. Generally getting one spawn is enough but more is merrier. Don't overstep your boundaries like if a person is in the vents and they have low health but they make it out, it's usually not that good to follow them.
Psion
Tips
- Use lots of Energy kits.
- Get psionic potency gene modification at GMD on floor 4.
- Always carry a thermal shield hence you take bonus damage from subzero.
Neutral Abilities
- Psi Wave - Creates a wave around you that periodically deals damage to nearby units, reduces the armor and speed of units that get hit by this wave, the wave deals bonus damage to alien units.
- Telekinesis - Lifts the units in the zone of cast, dealing damage over time and rendering them stunned.
- Mind Blast - Deals flat damage to selected person and silences them for 30 seconds.
- Guardian Shield - Gives the selected person invincibility for 5 seconds (upgraded with upgrades) at the cost of -50% speed (decreased with upgrades)
- Psionic Speed - Gives the selected person +2 (upgraded with upgrades) speed and +1 armor.
- Psi Push - Pushes targets away from you dealing damage. Does not change alignment.
Good Abilities
- Restoration Wave: Requires more than -10 Alignment. Does not heal, increases life Regen and life armor to all targets in a radius, Removes Radiation and Headcrab as well as mental infestation.
- Galacta Beam: Requires +15 Alignment. Shoots an orb of fire that damages targets and creates a Psion-unique fire in its path. (can shot through the walls)
- Battle Meditation: Requires (+25?) Alignment. Grants a powerful Hp/Shield boost and increases Movespeed and Attackspeed for 30/40/50/60 seconds.
- Spirit Bomb: Requires (+40?) Alignment. KAMEHAMEHAAAA! (Seriously though shoot a giant blue orb of death)
Evil Abilities
- Lightning: Requires Under 10 Alignment. Burst damage + Chain to nearby targets (and the original one for more burst)
- Soul Sap: Requires -15 Alignment. Reduces the targets max Hp and increases yours. If they are killed you get a permanent boost to your stats. (Health points, movement speed, attack speed, armor, life regen)
- Desolution Wave: Under (-25?). AOE damage around you that reduces armor and slows targets that are hit.
- Hellfire Blast: (Under -40?). Evil Kamehamehaaa!. With Explosions and Fire, Will damage you so be careful. (sometimes dont explode)
Strategies
Evil Psion - Usually it is best to start out aggressive with lightning/psi push/telekinesis and to carry a shotgun and some other weapon near you. Thermal shields are a must for an evil psion since psion takes bonus damage from subzero which is a thermal weapon. Lightning and telekinesis both slow down the person that you're trying to kill and deal decent damage. Lightning gives you negative alignment while telekinesis doesn't and telekinesis takes hellblaze's slot. It is still decent to go for telekinesis.
Good Psion - A good psion's day could be either boring or harsh since it depends on your teammates and host's skill at the same time. Focusing on good abilities, psionic push and getting psionic potency are all your priorities.
Neutral Psion - There isn't much to be said about neutral psion for now, It's just keeping yourself balanced to not kill too many of either side.
Android
Basics:
- You don't need oxygen.
- You are immune to vent gas.
- After gathering 6000 credits you can buy a form for yourself from the core.
- Android Does not choose their own Alignment, instead game randomly chooses it.
- 50% Helping humanity. (help good psion and humans, do not help evil psion)
- 25% Killing everyone (eradicate everyone including psion, alien and humans)
- 25% Helping alien. (help alien host and alien spawns)
- Android has Passive 8% Damage Resist.
Synthetic Upgrades:
- Armor - +2 armor +5% damage resistence.
- Speed - Speed set to 3,4 from 3 and sprint's cooldown is lowered.
- Shields - +200 shields (that's really it)
- Vision Gives Detection, vision range is set to 17 and you get +1 range for sniper
- Battery - You get +50 energy and +2 energy regen
Advanced Upgrades:
- Synthetic form - +125 HP +1 armor, synthetic upgrades carry over to this form.
- T-800 - 800 hp 250 energy, rapid life regeneration out of combat, does not have an inventory, uses miniguns as weapon. Dmg 4.34+- Can heal 10% of It's hp after 7 seconds of cast time.
- X-6 - 550 hp 250 energy, rapid life regeneration out of combat, does not have an inventory, uses Rockets as weapons 44 Dmg +- Can heal itself for 10% of It's hp after 7 seconds of cast time.
Items
Items are stored in your inventory, and can be used by clicking on them and/or clicking an area. All items can be bought from shops or found in crates.
There are four different shops that can be found on the station and moon.
- General Shop
- Medical Supplies
- Gadget Shop
- Explosives Depot
General Shop
Bomb Defusal Kit
When directly above a bomb, click to disable the bomb and drop the corresponding bomb item on the floor. Can be used on bombs that are about to be set off (e.g. an activated remote mine).
Power Cell
Use to power up a mech by 50 energy (cmech gets 100 energy instead).
Gold Power Cell
Use to power up a mech by 250 energy (cmech gets 500 energy instead).
Repair kits
Use to repair anything that can be damaged such as turrets, doors, security cameras, mechs and reactors. Repair kits are twice as effective for Chief Engineering Officer.
Barricades
Can be used to erect walls that deny access or funnel movement through a particular spot. Click the barricade to lower it.
Mech cells
Use on a mech to instantly give it 50 fuel.
Thermal Red Flare
Click to light up the surrounding area with a flare and give a ping on the minimap at your location for everyone to see. (It also reveals invisible units)
Medical Supplies
Energy pack
Restores 75% energy.
Restoration kit
Fully restore health over ~10 seconds. Cancelled if you get attacked. (Can be casted on others)
Medkit
Restore 40% of your health over ~8 seconds. Does not cancel if you get attacked. (Casts on self upon use)
Oxygen Tank
Restore half of your oxygen (the number in the top right, next to credits).
Portable Auto-Doc
Use it to clear infestations on yourself or life support systems. Activated when the auto-doc is researched. Can also be used to remove bite of bat and to remove mind infestation.
Portable Bloodtester
Activated when the bloodtester is researched. Can be used to test crew mates if they are alien. It turns blue if human, or purple if alien. There is a high probability that it can be inaccurate and it is recommended to be tested multiple times. (Doctor has twice as much accuracy while using this item)
Drugs
There are 4 types of drugs which increase attack speed, movement speed, or reduce damage for a period of time.
- Stimpack - Gives 10% attack speed boost, 20% movement speed boost, 10% damage reduction boost. ((?) not accurate, needs some tweaking)
- Adrenaline - Gives a 25% attack speed boost.
- Oxygen Shot - Gives a 45% movement speed boost.
- Morphine - Gives a 25% damage reduction boost.
Beware though, as an excessive use of these drugs can lead you to addiction. Addictions are the following:
- Stimpack addiction - Reduced speed, hp, attack speed
- Oxygen Shot addiction - Highly Reduced speed and you take damage over time
- Adrenaline addiction - Highly Reduced attack speed.
- Morphine addiction - 50 less hp and you take bonus damage from everything.
Upon using any of the drugs, you have 7% chance to be addicted after It's bonus effect dissapears. 5% for security guards (sec offi included). Android is immune to addiction. To cure addiction you need to use auto-doc on yourself, portable auto-doc works as well.
Gadget Shop
Sentry Turret
Attacks anything that moves. Rotates while active. Left click to deactivate, it then won't rotate or attack. Gives vision range for the player at all times. Requires weapons 2 to be bought to be purchasable.
Exterminator Turret
Uses flame attacks but only on aliens. Cannot be deactivated. Will not attack known aliens who are in human form. Gives a vision range for the player at all times. Requires weapons 2 to be bought to be purchasable.
Tesla Turret
Uses arc weapon attacks but only on aliens. Attacks bounce off to the nearby aliens. Can't be deactivated. Will not attack known aliens who are in human form. Gives a vision range for the player at all times. Requires weapons 3 to be bought to be purchasable. Has a permanent energy regen of 0,05 if weapons 5 are obtained.
Janitor Mop
Unlimited uses. Cleans up fire, debris, creep, and corpses with enough uses. Essential for silent host.
Thermal Shield
Click to activate, while activated gives immunity to explosives and thermal weapons (incinerator and subzero). It also gives you immunity to hades' attack. It can also be used to block off pulse grenade from draining your energy.
Explosives Depot
Thermite
Small explosion good for destroying rocks/doors/turrets. Explodes 3 seconds after placed.
Can be used to blow up gas tanks in hallways of station for a massive explosion.
Proximity Mine
A small explosion triggered by any biological entity walking over it.
Remote Mine
A larger explosion than thermite. Once placed, left click to trigger.
AIED
A massive walking bomb that can be controlled for ~5 seconds. However, you can also simply kill it to make it instantly detonate.
Grenades
- Pulse Grenade drains 100 energy from any units and stuns mechanical units for 3 seconds.
- Basic Grenade deals 50 damage, deals 2x damage to burrowed units.
- Flashbang reduces vision to 3. (does not affect massive targets)
- Molotov Grenade creates fire at the target spot for 30 seconds.
- Smoke Grenade creates a big passable area which reduces sight radius to ~1,5 for anything inside of it.
Weapon Rack
Weapon Racks are found on every floor and allows you to purchase weapons. All weapons are upgradable up to lvl 5 from the weapons upgrade bench found on floor 5 or moon. Only the Tier 1 weapons are unlocked at the start of the game. The CWO/CIO must upgrade the station weapons to unlock more powerful weapons and as a bonus makes these weapons cheaper to buy.
Since a contributor is constantly doing nothing but deleting the recipes they are going to stay down here,
M4AE: Minigun+Gauss gun+Grenade
Ol'smokey: White key+Shotgun+Incinerator
Wonderwaffle: Arc+Tesla armor+Fusion Railgun+Solarite+need uped Teleport who turn ON
These recipes need to be known to new players due to the fact they are technically endgame weaponry.
Tier 1 weapons (Weapons 1)
Gauss Gun
Starting weapon. Has good range but limited damage. Cheap to upgrade. When fully upgraded it will give a 20% movement speed bonus. (3.6 speed total)
Shotgun
Does massive damage at point blank range. Good for kiting enemies: attack, run, attack, run. (Best early gun IMO) Can uped to increase DMG from X2 to X3 and from X4 to X6
Reconnaissance Sniper
Does good damage at massive range. When fully upgraded, increases sight radius. Only weapon that can fire while stealth-ed. (useless IMO)
Incinerator
Short range, colossal damage vs biological and alien units, good for AoE on alien minions. It's easily countered by thermal shield. (if uped can use to dodge alins like atack alien burn atack again etc...)
Tier 2 weapons (Weapons 2)
Laser Rifle
High DPS against single/multiple targets. Strong against armored foes. Ignores armor. Good vs tanks and beetles/roaches. With the special upgrade becomes a luck relied weapon with 20% chance to crit. (Ion riffle if leg version of this weapon)
Arc Welder
Shoots arcs of lightning bolts that are powerful against mechanical foes. It is also extremely good at performing acts of sabotage or knocking down doors and security modules. Sucks energy out of attacked enemy units, with special upgrade the energy drain is increased. Extremely good weapon against android.
Sub-Zero
Similar to the Incinerator except that it is cold based. Highly effective as AoE against minions. Slows targets down. (Best weapon IMO) Kills everyone withnot termal and vision if use by alien in vent
Tier 3 weapons (Weapons 3)
Particle Phaser
A fast firing weapon ideal for taking down shields. Extremely effective versus mind aliens.
Pulse Destabiliser
A fast firing weapon that gives a chance to stun foes. It's stun is not dependent on luck at all. (good for taking down humans and host/spawn)
Tier 4 weapons (Weapons 4)
M134 Minigun
A fast firing powerful chain gun, good at shredding apart alien minions and powerful alien hosts alike. It comes with the drawback of reducing movement speed by 20%. (useless IMO) (can find on moon near red card or on planet near GMD or in cave)
EC-13 Plasma rifle
A high dps single-target weapon. Especially good against unarmored foes. (OP gun kills everyone ezly if you get it early (can find on planet near gmd or in cave))
Tier 5 weapon (Weapons 5)
Fusion Railgun
A badass railgun that will deal damage in a long line. The closer a target is, the lower damage the weapon does. Depending on the target's distance, it can deal around 20%-120% damage? (Percentages may be off but are close.) Comes with a movement speed penalty. However, the tier 5 upgrade removes this, albeit being incredibly expensive with over 10,000 combined credits in upgrades.
Lightsaber
A close range melee weapon. Does a whole lot of damage, has AOE effect, gives bonus movement speed and can basically obliterate anyone in its path. Most expensive weapon at 3200 credits. it's upgrade improves damage output even more. It can also block the following weapons attacks, reducing damage output of the weapons by a whole lot:
- All energy weapons
- M4AE (Legendary gauss rifle, can't block the grenade from it)
- Gauss Rifle
- Other lightsabers
- Plasma Cutter
- Some Alien attacks
Thor, Space Station and the Unknown Alien Vessel
Thor
Upon the research of weapons 5 or station's destruction after 5-20 minutes have passed, the Thor appears in the space. Thor is very powerfull capable of destroying behemoth ship. Thor can be controlled from inside of thor, on moon and on planet. Unfortunately you can't override the control if someone is already controlling thor. If weapons 3 are researched, thor can use bombard to bombard moon or planet, if weapons 5 are researched Thor can be used to nuke moon or planet (2 nukes only). Thor also has Ion Rifle spawned on it at all times.
Space Station
Space Station is definitely the most powerful thing (blackhole not included) in the space. Able to demolish everything. Space Station has different abilities depending on where you control it from. If you control it from floor 7, it has the special EMP (weapons 3), tractor beam (weapons 2), bombard ability (weapons 3), if control from reactor it has fusion cannon (reactor 2) which deals colossal amount of damage in single use. (You can use Nuke from both sides). Little known fact is with reactor 3 using weapon overload it also boosts station's weapon damage at the cost of rapid energy drain.
Unknown Alien Vessel
This unknown alien vessel comes at a random time starting from 7 minute mark. It is a dangerous threat to station and if ignored can take it down easily. It deals ~100 damage with each shot. Easiest way to take it down is using Fusion cannon which comes with reactor 2 as an ability for station. Upon It's death it grants the killer ~3000 minerals and summons a pylon on the station which periodically summons protoss units. If taken care of, the pylon grants ~1000 minerals and summons alien plasma blaster.
Youtube
TTorTsldTdlo: https://www.youtube.com/channel/UC0bqPzlbGyF4_qwOVOeDcdQ
OhGrandma: https://www.youtube.com/channel/UC8-ri149tQgRblZucUx8W6Q
Shaneman: https://www.youtube.com/channel/UC8Fm4FXORyFUtUQonGVu2WQ
FlameArrow57: https://www.youtube.com/channel/UC7XtsTLD0ZujPE3QSZbxEhA
5ceonware: https://www.youtube.com/channel/UCAPZolKS4S4GTUFbAfBQ4UQ
LoganationYT: https://www.youtube.com/channel/UCQRQ-3ZyI5nOEzrUmkiYPaA
Discord Server
This is the official discord, joining the discord server has a few benefits listed below:
- You can register yourself and others into the game.
- You can report bugs and suggest suggestions that could be implemented.
- You can look and be notified about #youtube and #streams channel to watch some players play parasite.
- You can report people for trolling so that they don't troll no more.
- You can get some guides/help from the community.
- You can ask some questions to the developers in #dev-q-a channel.
History
The map name was P A R A S I T E - Test while it was still in development. Now it's P A R A S I T E - Zeta.
See battle.net threads 1 through 6: https://us.battle.net/forums/en/sc2/topic/20757496707
Old wiki: http://p-a-r-a-s-i-t-e.wikia.com/wiki/P_A_R_A_S_I_T_E_Wiki